| WIND CHIMES
Software: PI7, Ga 5
Author: Barbie
Home Page: BJ's
Web World
Skill Level: Intermediate
Note: This tutorial was
written for those who have knowledge of the tools in PhotoImpact and Gif Animator. |

|
Open a new blank image 400 pixels X 400 pixels with a
white background.
Start with an Oval shape outline(set the outline at
size 3) and I used the gold color, but you can use any color you choose, and set it for 3D
Round. Now drag your oval shape from left to right but not too deep from top to bottom so
you get the 3D effect.
Now select the circle shape outline (set the outline at size at 1, using 3D Round) then
drag it just a little so as to create the top where you would hang it from. Be sure to
place it in the middle above the oval.
Now you need to select the straight line shape (set the outline at
0"hairline”Using 3D Round) You will drag the line from the circle to the left
edge of the oval, then repeat to the right side and then one in the center to give the
effect of the three lines holding the wind chimes.
Now I used some round gems that I found in PSP tubes and imported to PI stamps. I made
them small enough to decorate the oval of the chime. You can use any item you want here or
any design. Now select 1 object and right click, then click on select all. Now right click
and Merge as single Object.
Now you need to use the straight lines, set at 0 and using 3D Round, for the wires holding
the different chime butterflies. To do this you click where you want the line to start on
the oval and hold the shift key down, then come down where you want the end and click,
then release the shift key and your line will be perfectly straight. You should have 3
lines on the left and 3 lines on the right and 1 in the center. Make the two outer lines
the same length, which should be kind of short, then the next 1 on each side should be the
same size but longer than the outer ones. Then the 2 inside lines should be the longer
ones and the center 1 being the longest.
Now get the butterflies that you want
to use, or any other item that you select. You want them kind of small in size so that
they fit into the size of the wind chime and look more realistic. Ok when you have
attached all the butterflies to the strings you need to go back to the first one and
select the first butterfly, then hold the shift key down and select the string it is on,
then turn the shift key loose and the string and butterfly are both selected, now right
click and click on Merge as Single Object, then go above and send it to the back so the
line is behind the oval. Now repeat for all of the lines and butterflies. Remember to send
each to the back when finished so they won’t have funny looking strings waving in
front of the oval in animation shop. Now you can add your name at the top and use the
transformation tool to rotate it so that it sets on the top line just above the oval at a
slant.
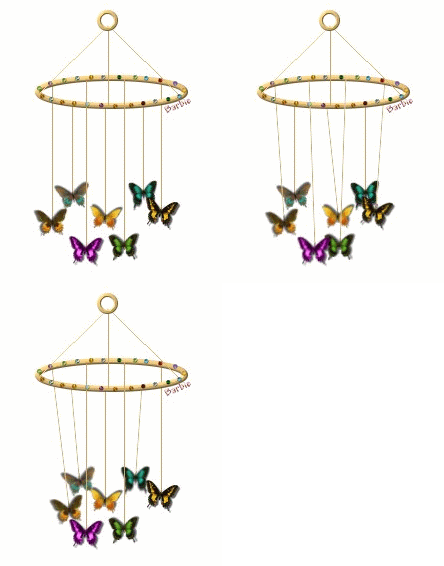
Ok now you use the crop tool and crop out the white area around the wind chimes so that
you get rid of the wasted space. Now click on Edit and Duplicate - Base image with
Objects, for total of 3 frames. This will leave your strings free so you can rotate them.
Now you leave the first frame alone. Depending on how much you want the butterflies to
sway, you just have to play with how much to move them, using the transformation tool with
set at rotate freely. Remember to move the 6 outer lines to the center in the 2nd frame
and the center 1 to the right. Now in the 3rd frame do the same but not quite the same
tilt and the center one you move to the left.
Now after you move all the strings to
a sway position, you need to go back to each one and move them just enough so that the top
of the string is at the same start position that it was in the first frame. That’s
why I decorate the oval so that I can have a guide as to where the strings need to stay so
they don’t come out blurry. Make sure they are all still behind the oval, if not go
back up and send them back.
Now save each frame and take them into Gif Animator, and I use the wizard to import them.
Then just set the delay on the frames to the speed that you want your chimes to sway and
you now have your own wind chimes.
This tutorial is copyright © BJ's Web World.
This document may not be translated,
duplicated, redistributed or otherwise appropriated. |